
How to add JWT authorization with Auth0 to a serverless API
In this example we will look at how to add JWT authorization with Auth0 to a serverless API using Serverless Stack (SST).
Requirements
- Node.js >= 10.15.1
- We’ll be using Node.js (or ES) in this example but you can also use TypeScript
- An AWS account with the AWS CLI configured locally
- An Auth0 account
Create an SST app
 Let’s start by creating an SST app.
$ npx create-serverless-stack@latest api-auth-jwt-auth0
$ cd api-auth-jwt-auth0
By default our app will be deployed to an environment (or stage) called dev and the us-east-1 AWS region. This can be changed in the sst.json in your project root.
{
  "name": "api-auth-jwt-auth0",
  "stage": "dev",
  "region": "us-east-1",
}
Project layout
An SST app is made up of two parts.
-
lib/— App InfrastructureThe code that describes the infrastructure of your serverless app is placed in the
lib/directory of your project. SST uses AWS CDK, to create the infrastructure. -
src/— App CodeThe code that’s run when your API is invoked is placed in the
src/directory of your project.
Setting up the API
Let’s start by setting up an API.
Replace the lib/MyStack.js with the following. Make sure to replace the jwtIssuer and jwtAudience with your Auth0 app’s Domain and Client ID.
Note that, the jwtIssuer option ends with a trailing slash (/).
import * as apigAuthorizers from "@aws-cdk/aws-apigatewayv2-authorizers";
import * as sst from "@serverless-stack/resources";

export default class MyStack extends sst.Stack {
  constructor(scope, id, props) {
    super(scope, id, props);

    // Create Api
    const api = new sst.Api(this, "Api", {
      defaultAuthorizer: new apigAuthorizers.HttpJwtAuthorizer({
        jwtAudience: ["UsGRQJJz5sDfPQDs6bhQ9Oc3hNISuVif"],
        jwtIssuer: "https://myorg.us.auth0.com/",
      }),
      defaultAuthorizationType: sst.ApiAuthorizationType.JWT,
      routes: {
        "GET /private": "src/private.main",
        "GET /public": {
          function: "src/public.main",
          authorizationType: sst.ApiAuthorizationType.NONE,
        },
      },
    });

    // Show the API endpoint and other info in the output
    this.addOutputs({
      ApiEndpoint: api.url,
    });
  }
}
We are creating an API here using the sst.Api construct. And we are adding two routes to it.
GET /private
GET /public
To secure our APIs we are adding the authorization type JWT and a JWT authorizer. This means the caller of the API needs to pass in a valid JWT token. In this case, it relies on Auth0 to authenticate users. The first route is a private endpoint. The second is a public endpoint and its authorization type is overridden to NONE.
Adding function code
Let’s create two functions, one handling the public route, and the other for the private route.
Add a src/public.js.
export async function main() {
  return {
    statusCode: 200,
    body: "Hello stranger!",
  };
}
Add a src/private.js.
export async function main() {
  return {
    statusCode: 200,
    body: "Hello user!",
  };
}
Now let’s test our new API.
Starting your dev environment
SST features a Live Lambda Development environment that allows you to work on your serverless apps live.
$ npx sst start
The first time you run this command it’ll take a couple of minutes to do the following:
- It’ll bootstrap your AWS environment to use CDK.
- Deploy a debug stack to power the Live Lambda Development environment.
- Deploy your app, but replace the functions in the
src/directory with ones that connect to your local client. - Start up a local client.
Once complete, you should see something like this.
===============
 Deploying app
===============

Preparing your SST app
Transpiling source
Linting source
Deploying stacks
dev-api-auth-jwt-auth0-my-stack: deploying...

 ✅  dev-api-auth-jwt-auth0-my-stack


Stack dev-api-auth-jwt-auth0-my-stack
  Status: deployed
  Outputs:
    ApiEndpoint: https://9ero2xj9cl.execute-api.us-east-1.amazonaws.com
The ApiEndpoint is the API we just created.
Now let’s try out our public route. Head over to the following in your browser. Make sure to replace the URL with your API.
https://9ero2xj9cl.execute-api.us-east-1.amazonaws.com/public
You should see the greeting Hello stranger!.
And if you try to visit the private route, you will see {"message":"Unauthorized"}.
https://9ero2xj9cl.execute-api.us-east-1.amazonaws.com/private
Login with Auth0
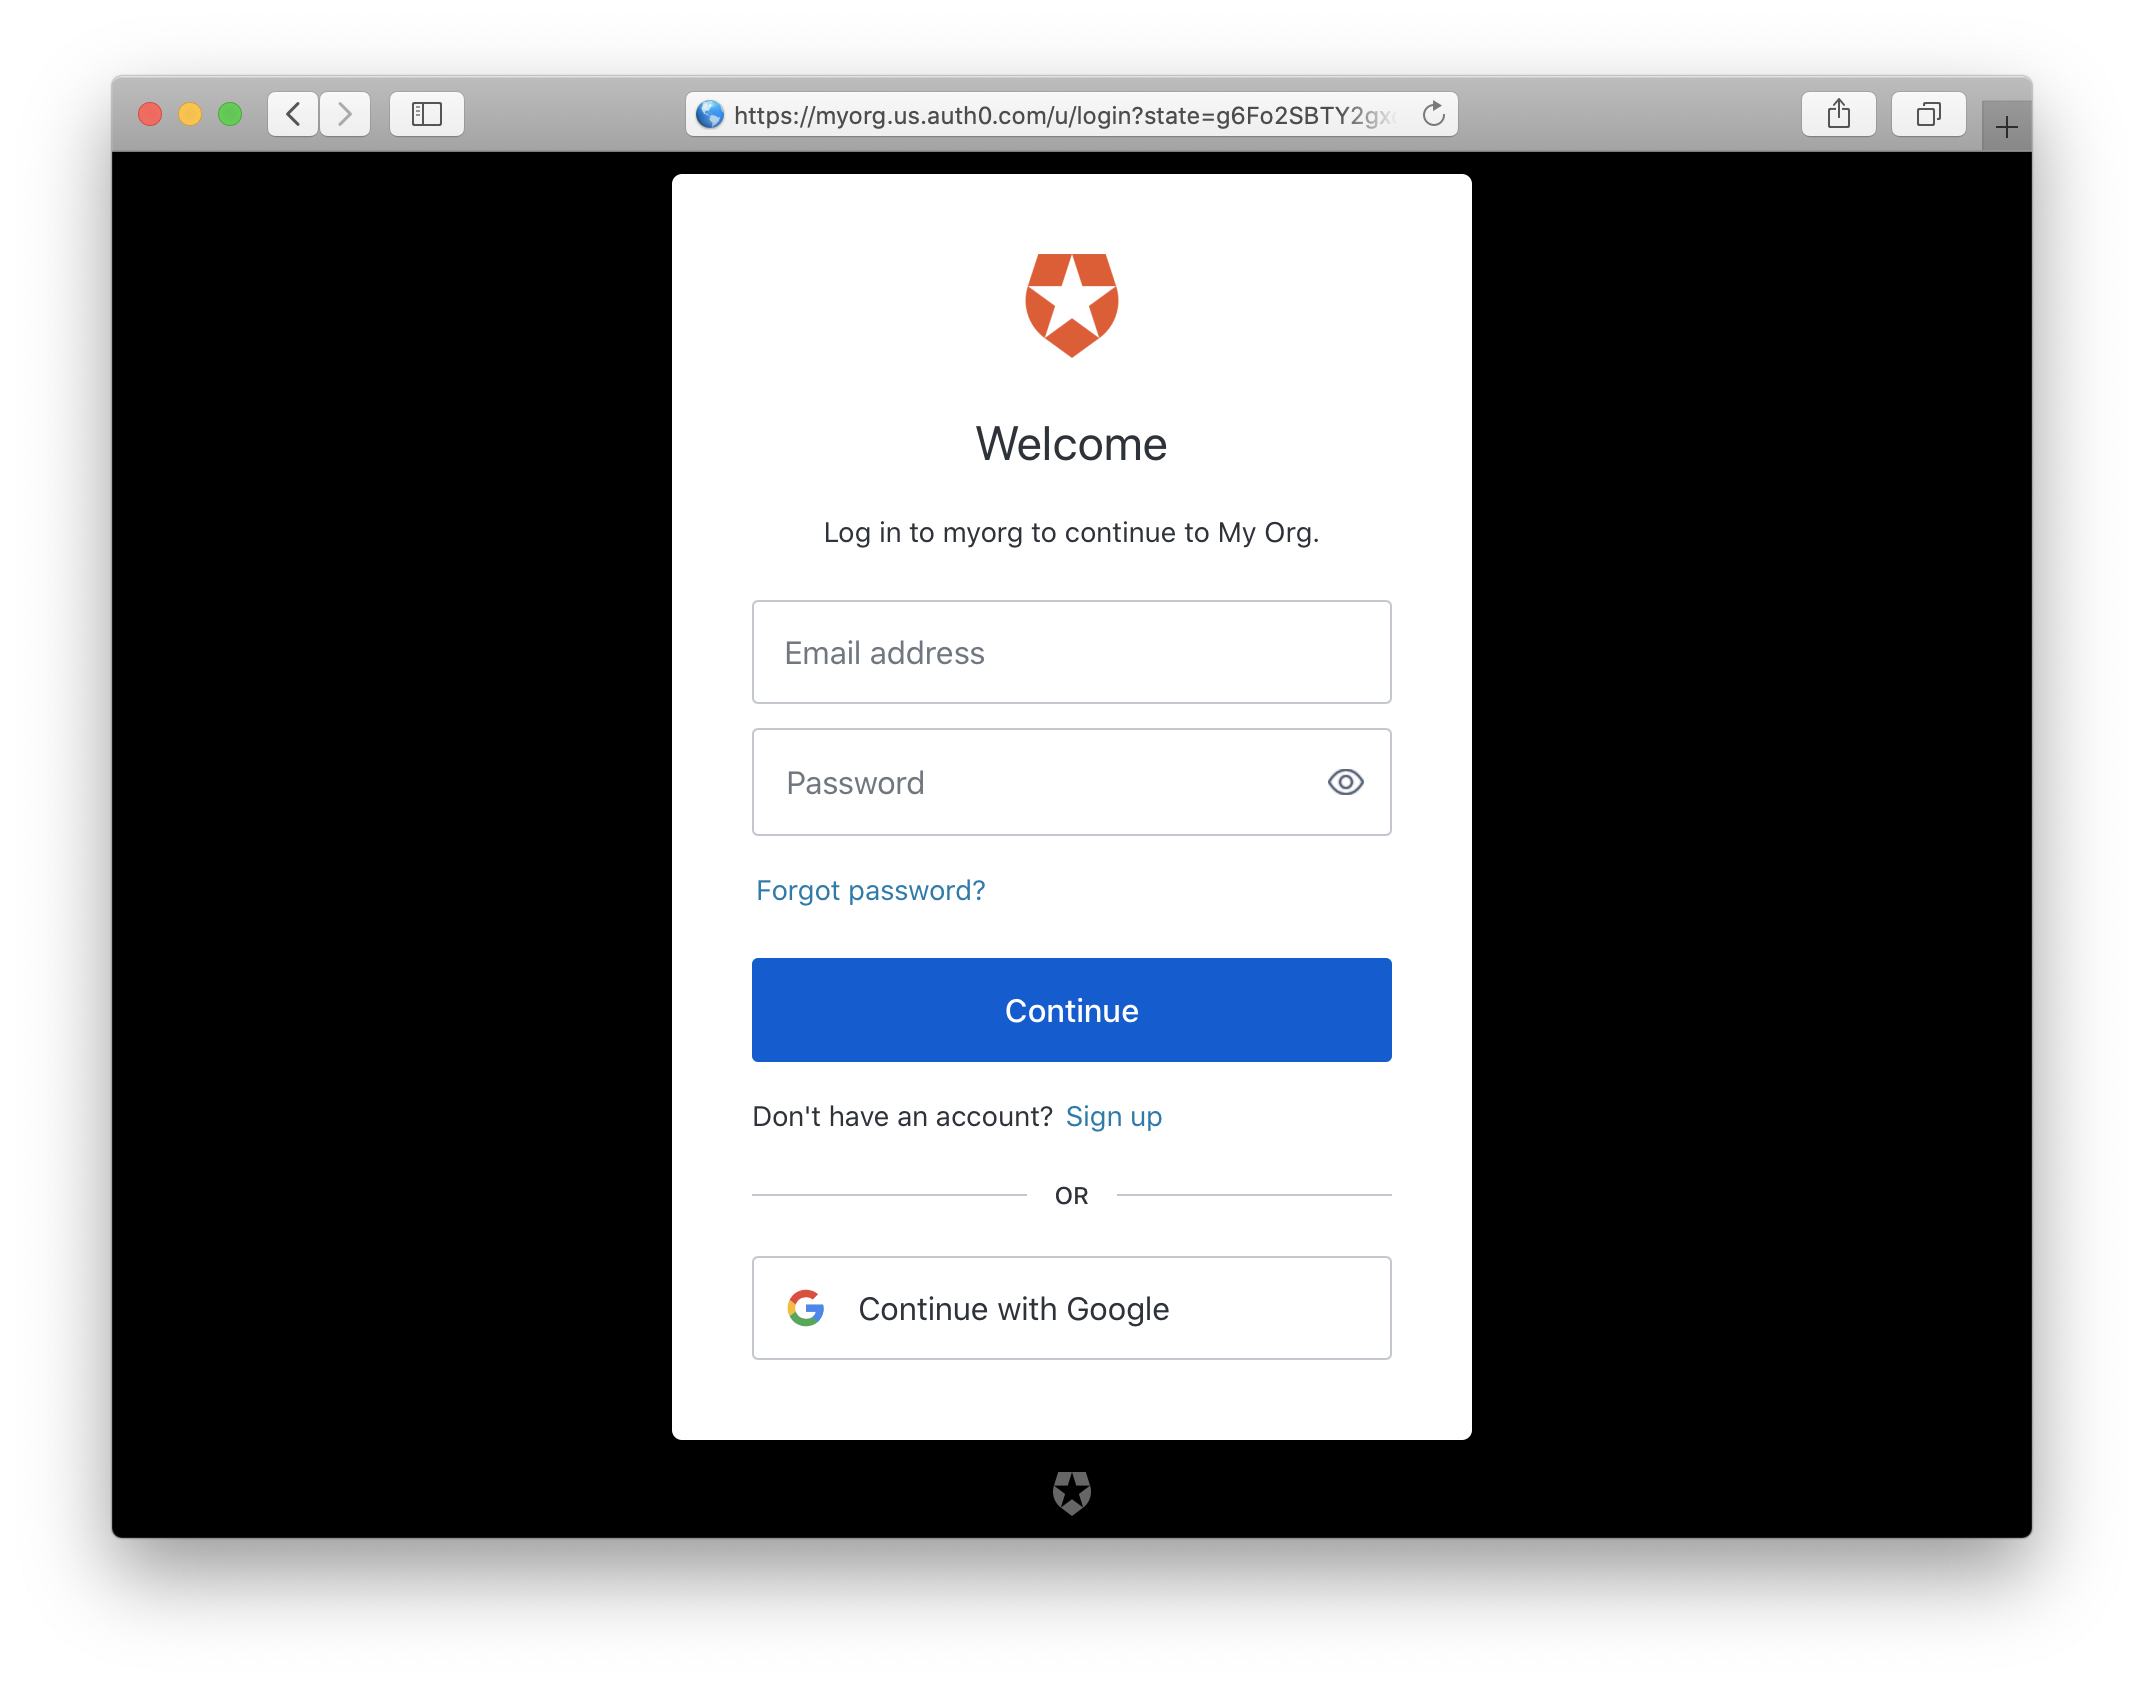
We are going to use Auth0’s universal login page to test logging in with Auth0.
First, we’ll configure a callback URL that’ll be used by the login page. It’ll redirect authenticated users to a page with the authorization code. Head over to your Auth0 app, select Settings, and add http://localhost:5678 to the Allowed Callback URLS. We don’t need a working URL for now. We just need the code. You can later point this to your frontend application.
Next, open up your browser and head over to the login page. Replace the client_id with your app’s Client ID. And the domain in the URL with the one for your Auth0 app.
https://myorg.us.auth0.com/authorize?response_type=code&client_id=UsGRQJJz5sDfPQDs6bhQ9Oc3hNISuVif&redirect_uri=http://localhost:5678&scope=openid%20profile
Your login page should look something like this. Continue logging in. If you haven’t setup a user, you can create one in your Auth0 dashboard.
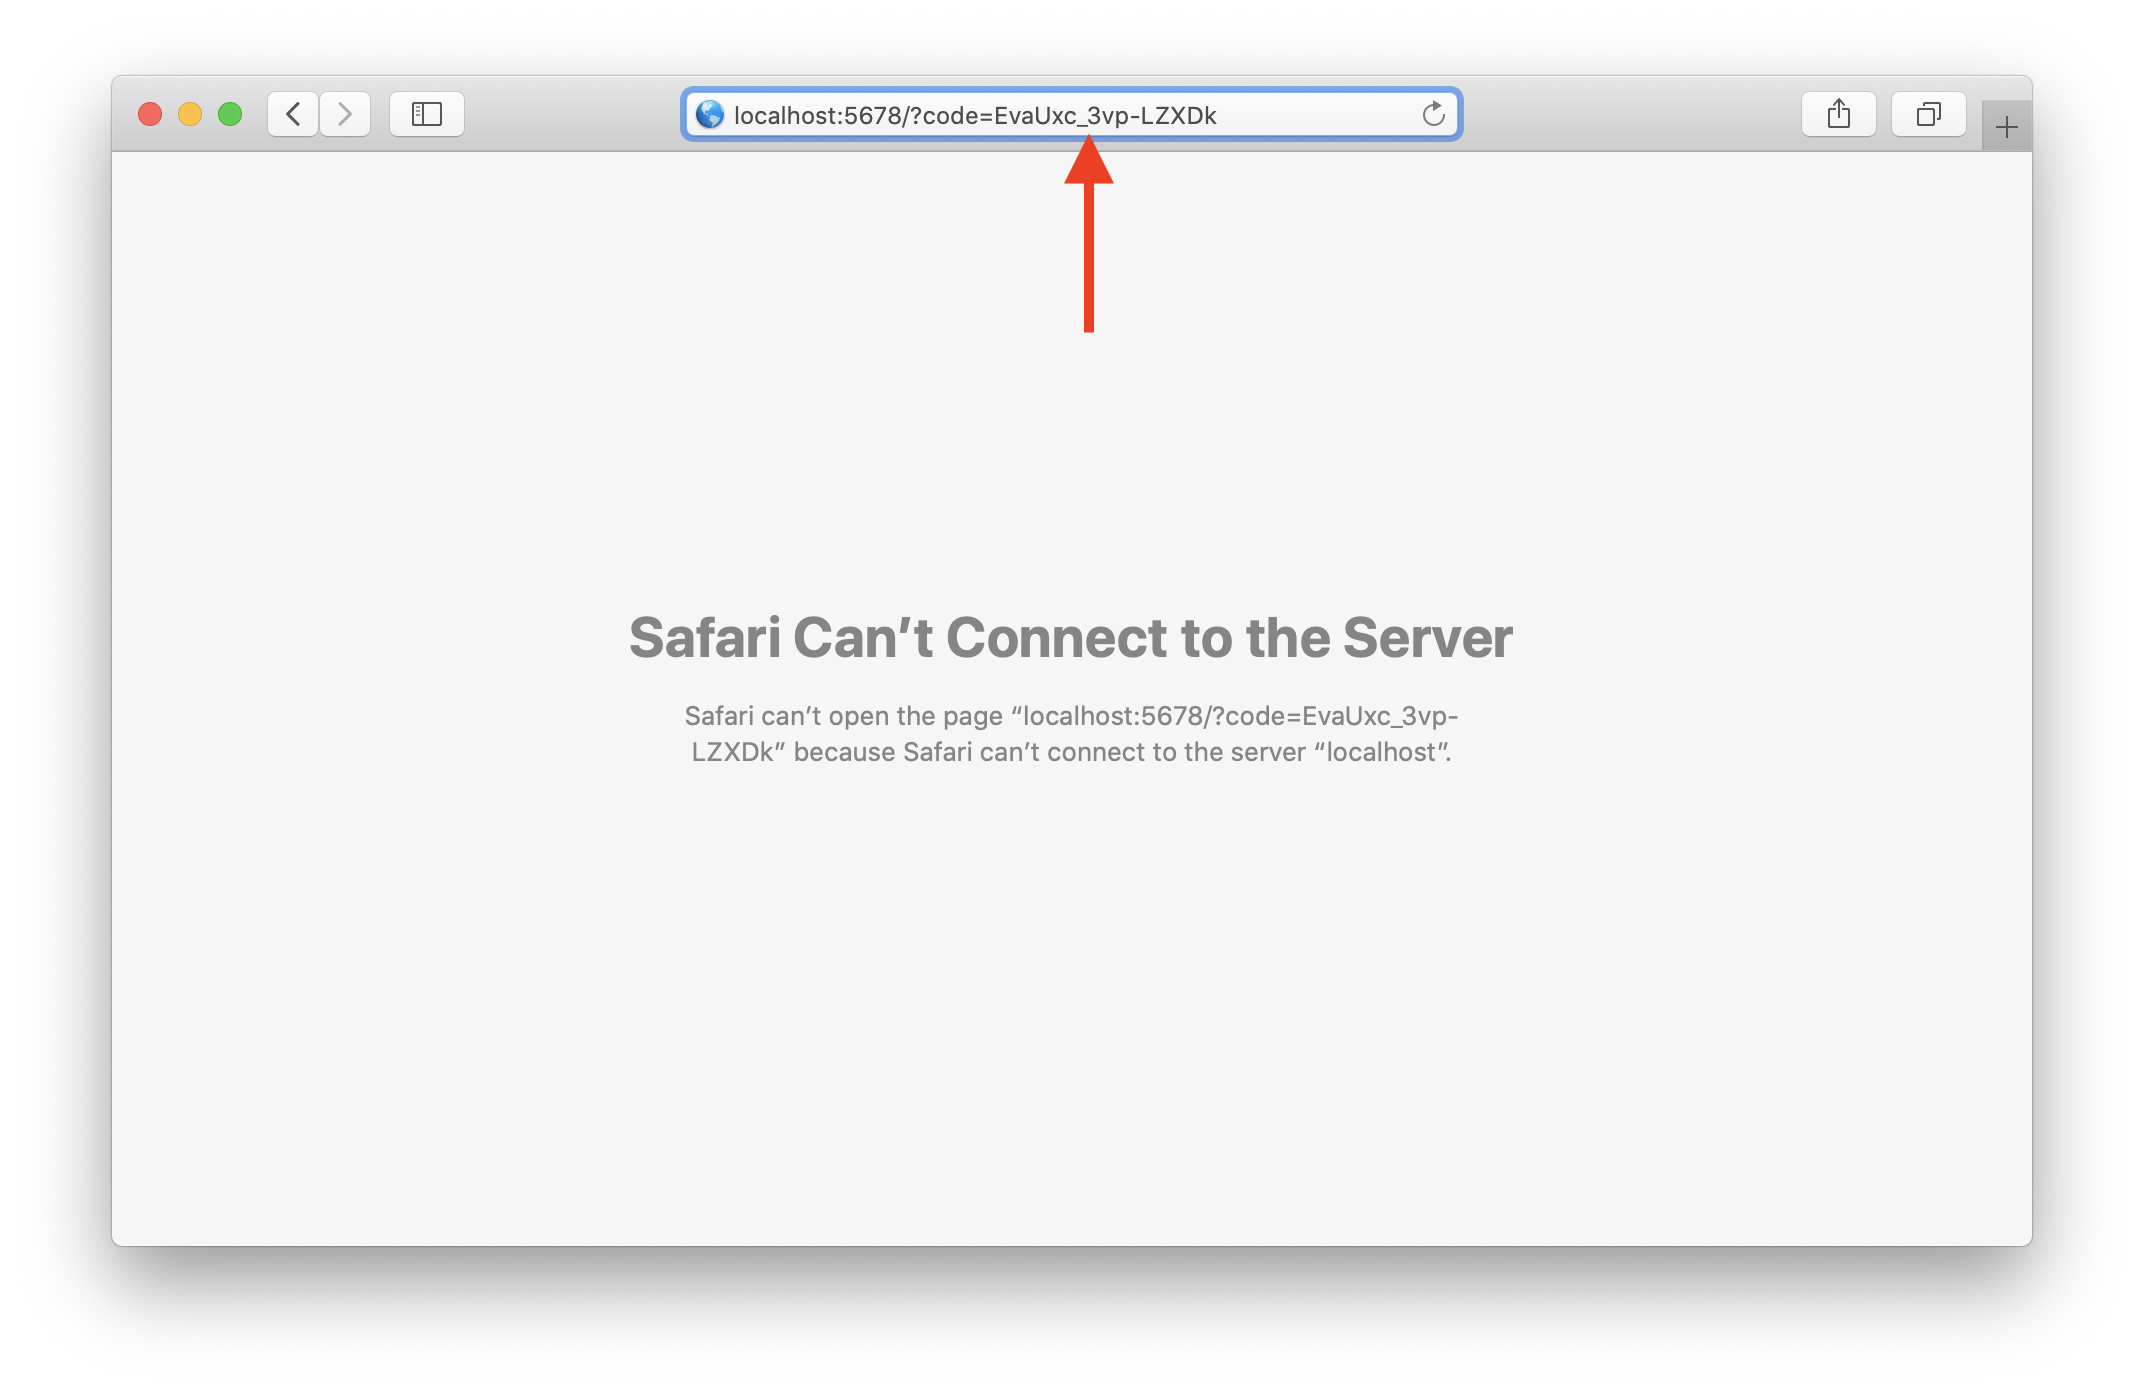
If the login was successful, the browser will be redirected to the callback URL. Copy the authorization code from the URL.
Next, we need to exchange the user’s code for tokens. Replace the url domain, client_id and client_secret with the ones for your Auth0 app. Also, replace the code with the authorization code from above.
$ curl --request POST \
  --url https://myorg.us.auth0.com/oauth/token \
  --data "grant_type=authorization_code&client_id=UsGRQJJz5sDfPQDs6bhQ9Oc3hNISuVif&client_secret=80ExzyYpIsGZ5WwOUkefgk8mg5tZiAdzisdnMEXybD7CQIBGgtZIEp_xVBGGSK6P&code=EvaUxc_3vp-LZXDk&redirect_uri=http://localhost:5678"
You should get a couple of tokens for the Auth0 user.
{
  "access_token":"0Yl7bZdnkS2LDBbHkpLBXCU2K3SRilnp",
  "id_token":"eyJhbGciOiJSUzI1NiIsInR5cCI6IkpXVCIsImtpZCI6Imk0REpDeWhabncydDN1dTd6TlI4USJ9.eyJuaWNrbmFtZSI6IndhbmdmYW5qaWUiLCJuYW1lIjoid2FuZ2ZhbmppZUBnbWFpbC5jb20iLCJwaWN0dXJlIjoiaHR0cHM6Ly9zLmdyYXZhdGFyLmNvbS9hdmF0YXIvMmE5Y2VlMTkxYWI3NjBlZmI3ZTU1ZTBkN2MzNjZiYmI_cz00ODAmcj1wZyZkPWh0dHBzJTNBJTJGJTJGY2RuLmF1dGgwLmNvbSUyRmF2YXRhcnMlMkZ3YS5wbmciLCJ1cGRhdGVkX2F0IjoiMjAyMS0wMi0yNFQwNDoxMjoxOC40NzJaIiwiaXNzIjoiaHR0cHM6Ly9zc3QtdGVzdC51cy5hdXRoMC5jb20vIiwic3ViIjoiYXV0aDB8NjAzNTdhNmQ5OGUzZTUwMDZhOWQ3NGEzIiwiYXVkIjoiVXNHUlFKSno1c0RmUFFEczZiaFE5T2MzaE5JU3VWaWUiLCJpYXQiOjE2MTQxNDAyMTksImV4cCI6MTYxNDE3NjIxOX0.KIB9bNHykhcFuMkXGEbu1TlcAp0A6xyze4wSwUh_BscnOlXjcKN-IoN6cgnt7YXUYJa7StN3WSduJJEx_LRpcrrUQw-V3BSGge06RA4bGWXM7S4rdpu4TCG0Lw_V272AKkWIrEGdOBd_Xw-lC8iwX0HXzuZ6-n4gzHPJAzhZ7Io0akkObsvSlQaRKOOXsx-cShWPXa3ZVThSgK5iO00LrsbPMICvvrQVSlwG2XnQDaonUnrXg6kKn0rP_GegoFCAz3buYDGYK__Z7oDaj4chldAqR1FmnJ2X9MfRmpjuX4-94ebicLv7O9fdMHIQQWCgtLmcu4T0mKpR2e3gL_13gQ",
  "scope":"openid profile",
  "expires_in":86400,
  "token_type":"Bearer"
}
Let’s make a call to the private route using the JWT token. Make sure to replace the token with IdToken from the previous step.
$ curl --url https://9ero2xj9cl.execute-api.us-east-1.amazonaws.com/private \
  -H "Authorization: Bearer eyJhbGciOiJSUzI1NiIsInR5cCI6IkpXVCIsImtpZCI6Imk0REpDeWhabncydDN1dTd6TlI4USJ9.eyJuaWNrbmFtZSI6IndhbmdmYW5qaWUiLCJuYW1lIjoid2FuZ2ZhbmppZUBnbWFpbC5jb20iLCJwaWN0dXJlIjoiaHR0cHM6Ly9zLmdyYXZhdGFyLmNvbS9hdmF0YXIvMmE5Y2VlMTkxYWI3NjBlZmI3ZTU1ZTBkN2MzNjZiYmI_cz00ODAmcj1wZyZkPWh0dHBzJTNBJTJGJTJGY2RuLmF1dGgwLmNvbSUyRmF2YXRhcnMlMkZ3YS5wbmciLCJ1cGRhdGVkX2F0IjoiMjAyMS0wMi0yNFQwNDoxMjoxOC40NzJaIiwiaXNzIjoiaHR0cHM6Ly9zc3QtdGVzdC51cy5hdXRoMC5jb20vIiwic3ViIjoiYXV0aDB8NjAzNTdhNmQ5OGUzZTUwMDZhOWQ3NGEzIiwiYXVkIjoiVXNHUlFKSno1c0RmUFFEczZiaFE5T2MzaE5JU3VWaWUiLCJpYXQiOjE2MTQxNDAyMTksImV4cCI6MTYxNDE3NjIxOX0.KIB9bNHykhcFuMkXGEbu1TlcAp0A6xyze4wSwUh_BscnOlXjcKN-IoN6cgnt7YXUYJa7StN3WSduJJEx_LRpcrrUQw-V3BSGge06RA4bGWXM7S4rdpu4TCG0Lw_V272AKkWIrEGdOBd_Xw-lC8iwX0HXzuZ6-n4gzHPJAzhZ7Io0akkObsvSlQaRKOOXsx-cShWPXa3ZVThSgK5iO00LrsbPMICvvrQVSlwG2XnQDaonUnrXg6kKn0rP_GegoFCAz3buYDGYK__Z7oDaj4chldAqR1FmnJ2X9MfRmpjuX4-94ebicLv7O9fdMHIQQWCgtLmcu4T0mKpR2e3gL_13gQ"
You should see the greeting Hello user!.
Making changes
Let’s make a quick change to our private route and print out the caller’s user id.
Replace src/private.js with the following.
export async function main(event) {
  return {
    statusCode: 200,
    body: `Hello ${event.requestContext.authorizer.jwt.claims.sub}!`,
  };
}
We are getting the user id from the event object.
If you head back to the terminal and hit the /private endpoint again.
$ curl --url https://9ero2xj9cl.execute-api.us-east-1.amazonaws.com/private \
  -H "Authorization: Bearer eyJhbGciOiJSUzI1NiIsInR5cCI6IkpXVCIsImtpZCI6Imk0REpDeWhabncydDN1dTd6TlI4USJ9.eyJuaWNrbmFtZSI6IndhbmdmYW5qaWUiLCJuYW1lIjoid2FuZ2ZhbmppZUBnbWFpbC5jb20iLCJwaWN0dXJlIjoiaHR0cHM6Ly9zLmdyYXZhdGFyLmNvbS9hdmF0YXIvMmE5Y2VlMTkxYWI3NjBlZmI3ZTU1ZTBkN2MzNjZiYmI_cz00ODAmcj1wZyZkPWh0dHBzJTNBJTJGJTJGY2RuLmF1dGgwLmNvbSUyRmF2YXRhcnMlMkZ3YS5wbmciLCJ1cGRhdGVkX2F0IjoiMjAyMS0wMi0yNFQwNDoxMjoxOC40NzJaIiwiaXNzIjoiaHR0cHM6Ly9zc3QtdGVzdC51cy5hdXRoMC5jb20vIiwic3ViIjoiYXV0aDB8NjAzNTdhNmQ5OGUzZTUwMDZhOWQ3NGEzIiwiYXVkIjoiVXNHUlFKSno1c0RmUFFEczZiaFE5T2MzaE5JU3VWaWUiLCJpYXQiOjE2MTQxNDAyMTksImV4cCI6MTYxNDE3NjIxOX0.KIB9bNHykhcFuMkXGEbu1TlcAp0A6xyze4wSwUh_BscnOlXjcKN-IoN6cgnt7YXUYJa7StN3WSduJJEx_LRpcrrUQw-V3BSGge06RA4bGWXM7S4rdpu4TCG0Lw_V272AKkWIrEGdOBd_Xw-lC8iwX0HXzuZ6-n4gzHPJAzhZ7Io0akkObsvSlQaRKOOXsx-cShWPXa3ZVThSgK5iO00LrsbPMICvvrQVSlwG2XnQDaonUnrXg6kKn0rP_GegoFCAz3buYDGYK__Z7oDaj4chldAqR1FmnJ2X9MfRmpjuX4-94ebicLv7O9fdMHIQQWCgtLmcu4T0mKpR2e3gL_13gQ"
You should see Hello auth0|60357a6d98e3e5006a9d74a3!.
Deploying your API
Now that our API is tested and ready to go. Let’s go ahead and deploy it for our users. You’ll recall that we were using a dev environment, the one specified in your sst.json.
However, we are going to deploy your API again. But to a different environment, called prod. This allows us to separate our environments, so when we are working in dev, it doesn’t break the API for our users.
Run the following in your terminal.
$ npx sst deploy --stage prod
A note on these environments. SST is simply deploying the same app twice using two different stage names. It prefixes the resources with the stage names to ensure that they don’t thrash.
Cleaning up
Finally, you can remove the resources created in this example using the following command.
$ npx sst remove
And to remove the prod environment.
$ npx sst remove --stage prod
Conclusion
And that’s it! You’ve got a brand new serverless API with a JWT authorizer using Auth0. A local development environment, to test and make changes. And it’s deployed to production as well, so you can share it with your users. Check out the repo below for the code we used in this example. And leave a comment if you have any questions!
Example repo for reference
github.com/serverless-stack/serverless-stack/tree/master/examples/api-auth-jwt-auth0For help and discussion
Comments on this exampleMore Examples
APIs
GraphQL
Databases
Authentication
Using AWS IAM
Using JWT
- How to add JWT authorization with Cognito User Pool to a serverless API
- How to add JWT authorization with Auth0 to a serverless API